What Is EIFS And Why Is It A Problem?
Exterior Insulation and Finish System (EIFS), also known as synthetic stucco, is an exterior wall cladding system used in the construction of commercial and residential buildings. It was introduced in Europe following WWII and was originally used over existing masonry walls.
It was introduced to the American market in the 1960s and had relatively little use except in commercial applications over existing masonry walls until the 1980s when it became more popular on higher-end homes and was installed over wood framed construction.
The main idea is to add energy efficient insulation to the exterior of the building and finish it with a thin mesh and cementitious finish which also provides an attractive stucco appearance. This adds energy efficiency to the building and also gives it an attractive, strong looking, stucco appearance, also enhancing the curb appeal.
The issue with EIFS is that it has been applied over wood framing, and often not detailed properly, allowing water to get behind the system and become trapped. Water trapped behind the EIFS in wood framed buildings causes rot, mold and fungus, and insect infestation. Many faulty or aging EIFS installations allow water entry with no way to drain causing extensive damage to the structure.
What is an EIFS Inspection?
An EIFS inspection is a visual and non-invasive inspection FOLLOWED BY invasive moisture probing at select areas. We will start with a visual inspection of the EIFS system and associated components such as windows, decks, doors, and flashing, followed by invasive moisture testing at selected locations.
It is very important to know that without invasive moisture probing, we have absolutely no way to know the condition of the underlying wall structure. When we receive calls from customers, and provide the price for the inspection, we often have surprise reactions because other companies are so much cheaper if the customer has already called around.
Our next question is then, ‘Are the other companies doing a visual inspection PLUS invasive moisture probing?’ Using infrared, non-invasive moisture meters, and visual inspection is not adequate and does not tell you the condition of the wall structure behind the EIFS. EIFS often looks great on the surface, but hides significant damage below.
The EIFS Inspection Process
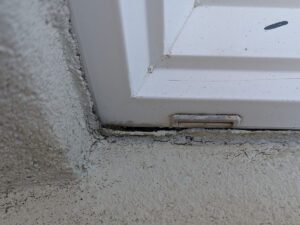
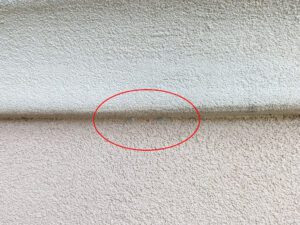
During the initial visual and non-invasive portion of the inspection, we review the entire installation up close and at a distance looking for any clues of improper installation, damage, failure of sealants, missing or damaged flashings, and more. We focus on areas surrounding the windows, flashings, at and below roof diverters (also called kickout flashing), at all penetrations through the EIFS system, and anywhere the system is too close to or buried in the ground cover.
Windows are heavily scrutinized to look for possible water entry points such as failed sealant joints, leaky or open miter joints and blocked weep holes. Windows are the most common water entry point given that the average house has approximately 10-15 windows. However, EIFS clad homes, which tend to be upper scale and larger, often have many more windows than that. We have inspected EIFS homes that have 30 or more windows.
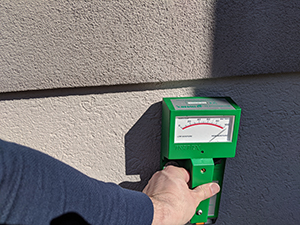
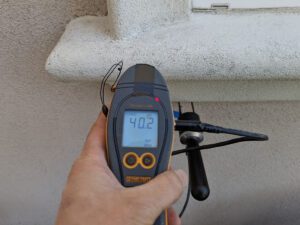
During the visual inspection, we typically also use a non-invasive Tramex moisture meter specifically designed for EIFS inspections to search for elevated moisture levels below the surface. The meter is first calibrated to a known dry area, then used to compare relative moisture indications to provide clues to where the wall should be probed for moisture readings.
The EIFS areas of the structure are scanned at common suspect areas such as at and below windows and any penetrations through the EIFS system, at cracking, and below kickout / diverter flashings. It is important to note that using a Tramex moisture meter by itself is not an indication that an area is wet or damaged; only invasive moisture testing can verify an area as being wet or damaged.
Prior to performing any moisture testing or probing of the EIFS system, we require a minimum of 12 hours of dry weather to avoid possible interference with accurate moisture readings due to recent rain and water. However, we can do a visual inspection of the EIFS system in any weather, since it’s not dependent on dry weather for accurate results.
EIFS Moisture Testing and Probing
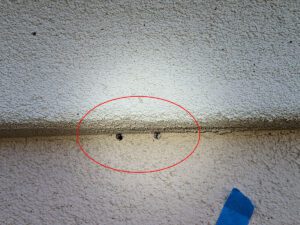
At selected areas identified during the visual inspection, we follow on with moisture probing.** Two small ¼ inch holes are drilled through the EIFS surface at each test site, moisture probes are inserted through the EIFS surface and insulation back to the wall sheathing to check the moisture level and firmness of the sheathing.
** Written permission from the homeowner is always required prior to any invasive probing of the EIFS system.
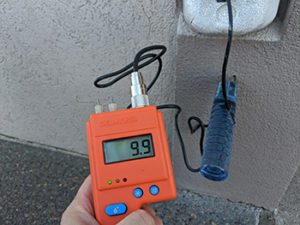
Moisture readings taken are recorded for documenting in the report along with whether the wall structure behind the foam feels firm and sound, or soft and decayed. The firmness of the sheathing is checked by using the moisture probe to feel for soft or decayed areas. The holes are then sealed with sealant matched to house color as closely as possible to prevent water entry.
In some cases the sheathing could be dry at the time of the inspection, but contain decay. Using these methods, we inspect all areas of EIFS and attempt to determine the condition of the wall sheathing. Our findings are detailed in a written report following the inspection. Moisture probe locations, moisture content readings, and whether any damage was detected will be included in the report.
Here is the sequence showing the process of holes drilled, moisture probing, and holes filled with sealant. We carry many kinds and colors of sealant and try to match the color of the EIFS as closely as possible. When possible, we also try to probe under ledges further hiding the probe holes. Once the holes are filled, the holes are usually not able to easily be found again and only noticeable to the person that did the probing or someone knowing where to look.
|
|
|
|
|
|
The EIFS Report
We will provide as much detailed information about the system as possible to not only help you make informed decisions about the property, but also to guide EIFS repair contractors to perform maintenance and repairs.
We’ll provide a detailed written report that includes any deficiencies found, including:
- Failed, cracking, or gapping sealant
- Areas with inadequate clearance from the ground cover or hardscape
- Vegetation clearance issues
- Improperly installed EIFS materials
- Missing or improper flashing
- Improperly sealed penetrations
- Areas of moisture probing and readings taken
- Any areas of decay or damage discovered
Do You Need an EIFS Inspection?
EIFS inspections are important for a number of reasons:
1. Moisture Intrusion Detection: EIFS, if not properly installed or maintained, can be susceptible to moisture intrusion. Water infiltration can lead to significant issues, including mold growth, degradation of the insulation, and damage to the building structure. An inspection can help detect signs of moisture-related problems.
2. System Integrity: An inspection assesses the overall integrity of the EIFS, checking for any damage, cracks, or areas where the system may be compromised. Identifying and addressing issues early can prevent more extensive and costly repairs later on.
3. Insurance and Lending Requirements: Some insurance providers and lenders may require an EIFS inspection as part of their due diligence process. Ensuring that the EIFS meets certain standards may be a prerequisite for obtaining or maintaining insurance coverage or securing financing.
4. Property Transactions: If you are buying or selling a property with EIFS, an inspection can provide valuable information about the condition of the cladding system. It allows potential issues to be addressed before the sale is finalized.
5. Preventive Maintenance: Regular inspections are a part of proactive maintenance. EIFS manufacturers also recommend professional inspection, over and above homeowner diligence and periodic inspection.Identifying and addressing minor issues early can extend the life of the EIFS and prevent more significant problems in the future.
Contact us today to schedule your EIFS inspection and safeguard your property against potential risks. Our experienced team is here to provide you with peace of mind and protect your investment.
Get answers from an Inspection Specialist
Give us a call today to answer any questions you have regarding home inspections, Radon testing, or sewer line inspections.
We're Certified Inspectors

Schedule an Inspection Today
We are ready to schedule an inspection for you. Click the button and you can choose your date and time and do everything online. Or give us a call and we can schedule it for you.