Stone Veneer and Stucco Inspection Information and Procedure
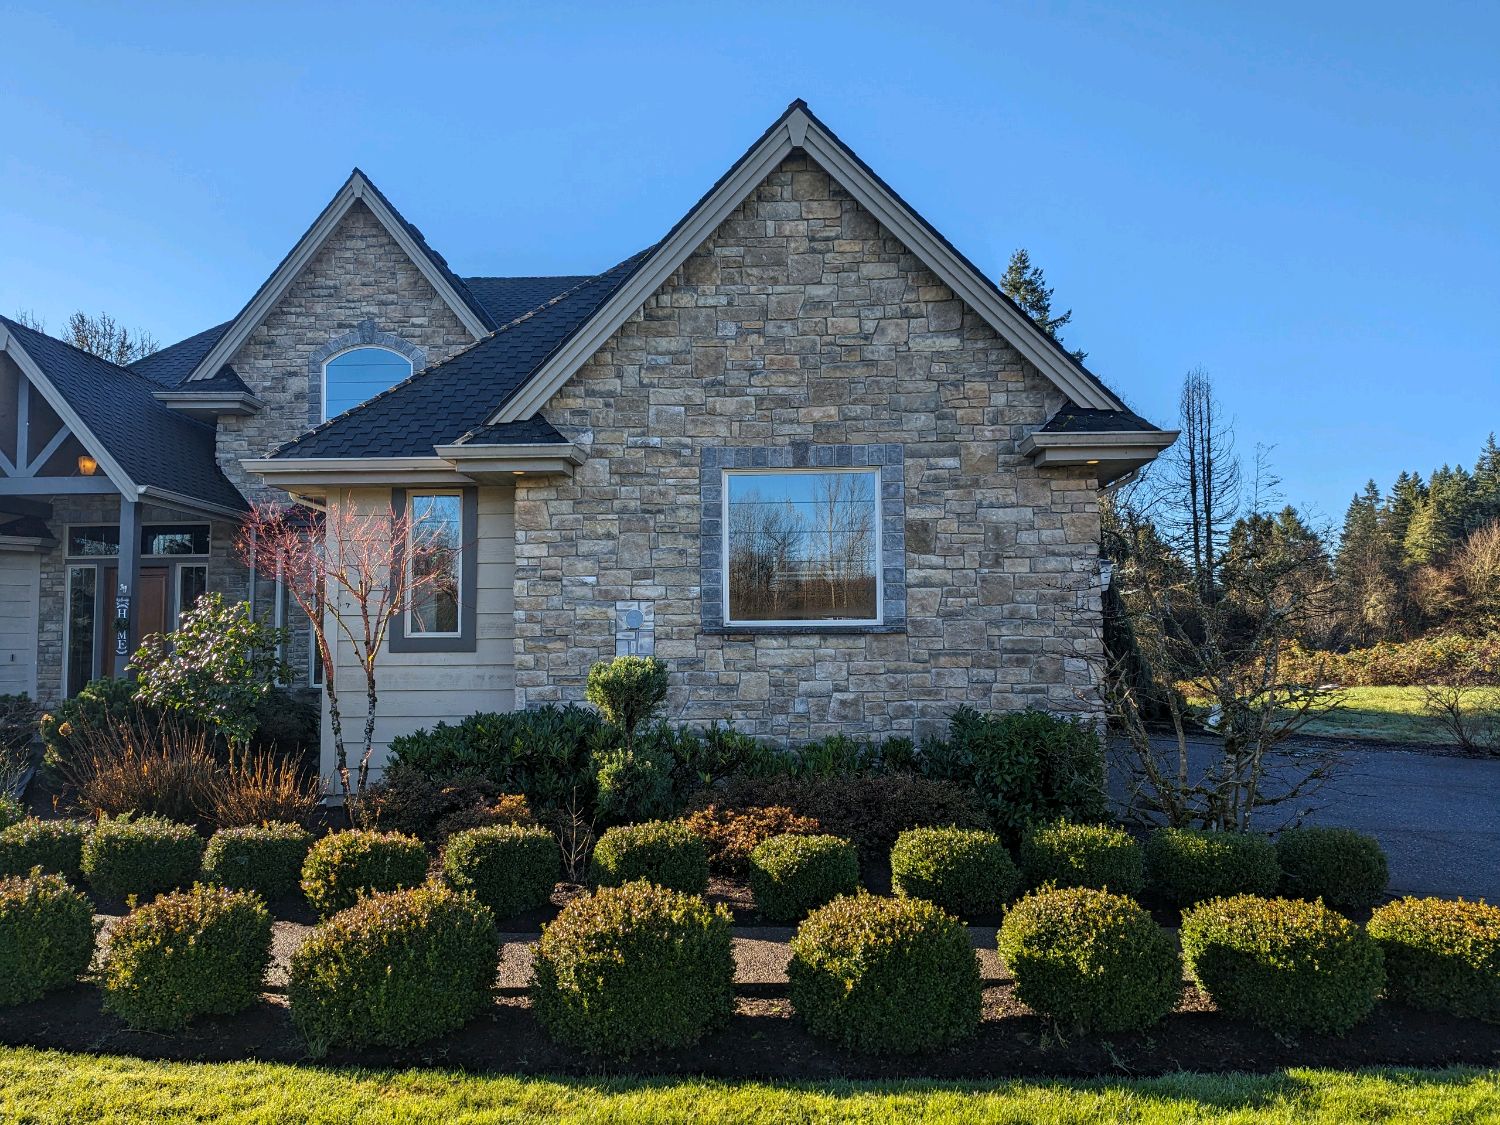
Adhered Stone Manufactured Veneer (ASMV), shortened to ASV, has become an increasingly popular exterior finish across the country and in the Pacific Northwest, adding a touch of elegance and natural beauty to homes. ASV is a manufactured masonry, lightweight, non-load-bearing wall cladding meant to simulate the appearance of natural stone.
 However, if installed incorrectly, stone veneers can be susceptible to water intrusion and extensive damage to the structure. Since the mid-2000s, there have been published guidelines for the installation of ASV, however, they are seldom fully adhered to during installation. Currently, stone veneer manufacturers typically indicate to follow the published guidelines of the National Concrete Masonry Association (NCMA) stone veneer installation guide.
This guide has changed names and agencies a few times since initial publishing in 2006 under the Adhered Concrete Masonry Veneer (ACMV) field guide to manufactured stone installation. Prior to the mid-2000s and published directives specifically for stone veneer installation, installations were guided by the exterior plaster wall assembly codes.
This is the same as hard coat stucco. Hard coat stucco and adhered stone veneer are nearly identical, so much so, that some folks call stone veneer ‘lumpy stucco’. Thus, guidelines for the installation of adhered stone veneers have actually been around for quite some time in published codes and guidelines for things such as clearance, weep screeds, flashings, and many other details.
A stone veneer inspection by 45th Parallel Home Inspection provides valuable insight to the current condition and performance of the stone veneer. Our thorough evaluation will outline potential issues that might otherwise lead to costly repairs and disruptions after you've moved in.
Early Detection
By identifying problems upfront, you can negotiate repairs or adjustments to the purchase price, protecting your investment and ensuring a smooth transition into your new home. A full and thorough stone veneer inspection involves the use of not only visual inspection but also invasive moisture testing behind the stone to check the wall structure for moisture content and for wood decay.
For home buyers, when there is adhered stone veneer on a home, chances are, you would benefit from having a stone veneer inspection. Sadly, nearly all stone veneer installations suffer from the same defects time and time again, making the assembly more prone to water intrusion over time.
For home sellers, an inspection can be a valuable tool in the selling process, even if you aren’t planning to sell your home any time soon. If you do plan to sell your home, by proactively addressing any issues identified in the inspection report, you can increase your home's appeal to potential buyers and avoid unexpected delays or disputes during the closing process, providing the buyer peace of mind. A clean inspection report can also strengthen your home's market value, potentially leading to a quicker sale and a better price.
Industry Guidelines for Adhered Stone Veneer Inspections
The latest version of the manufactured stone veneer installation guide published and updated regularly by the National Concrete Masonry Association (NCMA) details the best practices and correct installation of adhered stone veneer. Details and links to the guide are located on the NCMA manufactured stone veneer information page. However, the vast majority of new and existing installations we inspect are incorrectly installed to some degree per industry guidelines. Some installations are close to perfect, while others are sadly deficient.
Older installations may not have had as much guidance and installation requirements as they do today and would have fallen under the exterior plaster wall assembly codes at the time. The best we can do with older installations is to look at issues that are definitely a problem, or a potential future problem, and couple that with invasive moisture testing to determine how the stone assembly is performing.
The Consequences of Incorrect Stone Veneer Installation
A poorly installed stone veneer can lead to a host of problems, including:
- Water intrusion: Moisture that enters behind the stone can potentially damage the wood frame wall, and cause mold, rot, and structural issues.
- Structural damage: Improperly installed stone veneer can allow water entry behind the stone and into the wall structure where it is trapped and can cause significant structural damage.
- Corrosion: Moisture trapped behind the veneer can lead to corrosion of metal components, such as fasteners, metal lath, and weep screeds. Rusting metal expands and can break stones and cause them to even fall off of the wall.
Common Defects in Stone Veneer and Stucco
Given the abundance of published documentation, and manufacturer instructions indicating how to install the product or that refers to the published installation guidelines from the NCMA, it is unclear why the instructions are not followed in most installations. Some of the most common typical defects encountered are:
- Lack of proper sealant bead between stone and other claddings such as EIFS, fiber cement, and wood
- Lack of proper sealant bead where stone meets window frames and door frames
- Lack of proper clearance from soft grade (4 inches), and hardscape (2 inches)
- Lack of flashing over openings and at the top of the stone assembly where it transitions from other cladding to stone
- Lack of proper drainage behind the stone and weep screed at the base of the stone assembly
As with all wall cladding, the most common areas for water intrusion are penetrations or openings in the wall such as windows, and doors, and utility penetrations like hose bibs, lights, etc. Penetrations lacking proper detailing, clearance, flashing, and sealant can result in water penetration, mold and rot of the wall structure, and costly repairs. Failing, inadequate, or missing water-resistant barriers can also allow water intrusion and damage.
The Inspection Process
A comprehensive stone veneer inspection involves a combination of visual examination and advanced technology.
Visual Inspection
First, a visual inspection is conducted and any deficiencies are documented. Deficiencies could include such things as:
- Lack of clearance from hard and soft grades
- Lack of, inadequate, or incorrect flashings
- Efflorescence, moss, and algae growth, or staining indicating water intrusion behind the stone
- Cracked, loose, missing, or broken stones
- Holes or gaps in mortar
- Failed sealant or mortar joints
- Lack of sealant joints
Critical areas such as kick-out flashing areas or below windows, and any areas having visual indications of moisture intrusion are then selected for invasive moisture probing.
Performing the inspection at the level of detail necessary to provide a thorough report is time-consuming and thus, stone veneer inspections are quite expensive.
Moisture Probing
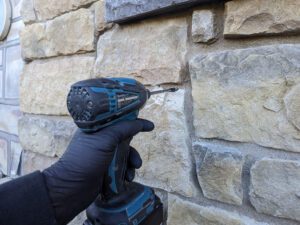
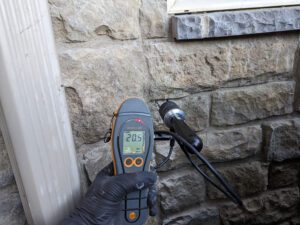
It is impossible to determine the condition of the wall sheathing under the stone veneer masonry walls without inserting moisture probes and taking moisture measurements. At each moisture probe site, two small 1/4 inch holes are drilled, moisture probes are inserted to measure moisture content in the wall sheathing, the sheathing is probed to determine if softness or decay exists, and the holes are filled with silicone as closely as possible matching the color of the mortar.
1/4 inch holes drilled in stone mortar joint |
|
|
Moisture probing performed |
|
|
Holes filled with sealant |
|
|

Moisture probe measurement locations are documented and included in a detailed report.
Adhered Stone Veneer Report
The entire inspection process is transferred into a detailed electronic report where you will be able to see and understand the findings of the visual inspection and the moisture probing results. Issues, along with positive findings are outlined with photos and narratives in the visual inspection portion of the report.
Moisture probe locations, moisture level readings, and any areas of damage located are documented in the moisture testing section of the report. In our opinion, all of the work that goes into the inspection to be able to produce the report boils down to the three most important overarching themes:
- Was there any damage to the wall structure located behind the stone, and if so where?
- Are there any significant defects recommended for immediate correction?
- If no damage is found, and the stone is currently performing well, then have some peace of mind
Check out a sample adhered stone veneer report.
At 45th Parallel Home Inspection, we are committed to providing you with comprehensive and accurate inspection reports. Our expertise in stone veneer and stucco inspections can help protect your home investment. Contact us today to schedule your inspection.
Frequently Asked Questions (FAQs)
Common questions about stone veneer and stucco inspections
A stone veneer inspection helps identify potential and existing problems before they escalate into costly repairs or to minimize existing damage going forward. If given a clean bill of health, it can also provide peace of mind and help protect your investment.
It's recommended to have a stone veneer inspection if you are buying or selling a home having adhered stone veneer installed. Additionally, every 5-10 years, or sooner if you notice signs of damage.
There is a huge amount of effort, specialized training, and expertise that goes into the process of being able to produce a thorough stone veneer inspection report. The inspection and report writing process is time-consuming, and thus, it is quite expensive. In our experience, the benefits received from most stone veneer inspection reports far outweigh the cost.
Our inspectors will provide a detailed report outlining the issues and potential solutions. You can then work with contractors to obtain repair costs, and address the problems.
Yes, but it's important to understand the extent of the problems and factor in the estimated cost of repairs when making an offer.
Coverage varies by policy. It's essential to review your homeowner's insurance policy and to have a conversation with your home insurance provider to understand what is covered.
Get answers from an Inspection Specialist
Give us a call today to answer any questions you have regarding home inspections, Radon testing, or sewer line inspections.
At 45th Parallel Home Inspection, we are committed to providing you with comprehensive and accurate inspection reports. Our expertise in stone veneer and stucco inspections can help protect your home investment. Contact us today to schedule your inspection.
We're Certified Inspectors

Schedule an Inspection Today
We are ready to schedule an inspection for you. Click the button and you can choose your date and time and do everything online. Or give us a call and we can schedule it for you.